|
Swadge ESP32-S2
APIs to develop for the Magfest Swadge
|
|
Swadge ESP32-S2
APIs to develop for the Magfest Swadge
|
So, you've decided you want to make a swadge mode. Maybe you went to the Swadge developer panel, maybe you talked to a dev, Maybe you were playing Robo Runner and found the QR code, or maybe you just picked up a Swadge and wanted to know how you actually make a game for a bespoke game console.
Well, you're in the right place.
This document aims to be a full, verbose tutorial describing how to make a mode for a swadge. It will walk you through the basics, explain why you would want to pick certain options, and describes the basic loop so you can started pretty quickly.
The Swadge firmware is written in C, so knowledge of C and C-likes will be useful.
If you're ever lost, feel free to message us on slack or discord. We'd love to help you make new games!
While it might be tempting to dive in and start typing, there's a step that is usually helpful in making sure you can actually finish a project.
Documentation!
I know, that stuff seems boring. But when you're writing the documentation there's a bunch of great benefits:
If you really don't want to write documentation, you don't have to. A lot of Devs just wing it very successfully. There's a lot of truth to the "Test Early" methodology, which encourages devs to at least make a basic prototype without the bells and whistles to make sure the game is fun before writing a book's worth of documentation. It works different for different people, but if you're using this guide it's likely your first game so maybe at least jot down a few goals or sketch some concept art. It can't hurt.
Another consideration is that your grand RPG idea sucks as a first game. It's probably a really cool game, don't get me wrong, but if you spend lots of hours of coding and can't actually run or test anything because the scope is too big, it's easy to lose interest. Consider some of these games as simple starting points:
These projects don't have too much to them, but are all fun to play, right? If you start with one of these, you can get some experience with the swadge so you're not trying to figure out the swadge and an entirely new set of mechanics at the same time.
I'll be building a mode to help illustrate how everything is made, and I will in fact be remaking Chrome's dino runner!
Since I don't just want to use the Dino, I'm going to change the character to robot, and have him jumping flaming barrels and dodging swinging lamps.
For those unfamiliar, the "Chrome Dino Game" is an endless runner that is built into Chrome browser. If you don't have internet, it automatically loads. If you don't want to turn off your internet, you can navigate to chrome::/dino instead. Go ahead and play a few rounds, just remember to come back.
Below, there are two images of the game:

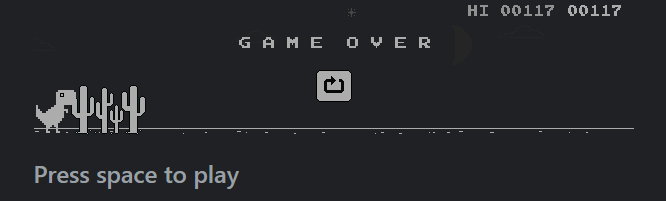
The Dino automatically runs to the side once the spacebar is pressed, and obstacles start appearing from the right of the screen. The player must press the spacebar to jump over the cacti obstacles which vary in size and avoid jumping into the pterodactyls that swoop in. As the Dino runs, it accumulates a score until it collides with an object, at which point the high score is saved and the player is prompted to try again.
And, well, that's going to be my game description. It's not long, but let's break it down, shall we?
Here's some components we're going to need to make this game:
Even a simple game has a lot of systems that it requires to work. Some of the above are trivial to implement, as the relevant systems are already pretty much solved. Others are going to be developed entirely from scratch.
Also, did you notice the new requirement I made while writing it all out? I didn't initially indicate that the ground got faster as time went on. If I hadn't written that out, I might have forgotten to add it in. Or, we could consider it extra since it wasn't part of my initial description, so maybe it's more than I want. For now, let's keep it.
If you haven't already, set up your development environment, and we can move onto the next step. Click here to load the 'Configuring a development environment' page.
I encourage you to make this game along with me, so I will tell you what you'd need to do to follow along and describing what I'm doing.
If this is your first time using VS Code, you might be a little lost. There's a lot of cool features, but you don't need to know too much to be able to program successfully.
If you've used VS Code before, you can skip this section.
If you've followed the configuration tutorial, you'll have the files you need on your computer.
Click "File" in the top bar of VS Code, press "open folder" and navigate to the folder. By default it's under your username/esp/Super-2024-Swadge-FW/
If you've found the correct folder, the files should be shown in the side pane.

This button will show the file system of the project. Here you can see the status of the files, open or create new files, and navigate around the project.

Extensions provide extra functionality to VS Code. Some common ones are provide the code needed to compile the C code we're writing, spell checkers, syntax highlighters (how we get that colorful text automatically), and even tracking what we still need to get done!
Some of the extensions provided are critical to have installed, such as the C syntax highlighter. Others, such as the spellchecker, are just nice to have. if you're unsure, download all of the ones in the "recommended" tab inside the extensions bar and you'll be fine.
The recommended extensions are per-project, so if you haven't loaded the correct repository they won't show up.

This button leads to the debug screen. When you run your code, sometimes you'll want to stop the program mid-execution to see exactly what it's doing. When you press F5, this tab automatically opens.
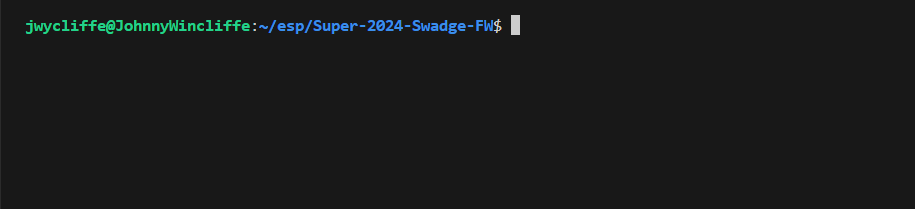
The terminal is where you're going to interact with some of the core functions of the library. Don't worry, it's just typing. The terminal will also show you what errors you have, and can be used to provide information on how your mode is operation if you need.
Whenever there's some text that looks like the following: make all you can enter it into the terminal to run the command.
There's some features of the terminal that can be done with a graphic user interface (GUI) and I'll point those out when you can make a choice.
If you're in the project directory, why not try running make all? See what comes out.
Alright, you can see the files. Can you start coding now?
Almost! First we need to learn a little bit about git. Git is a versioning software that allows multiple people to work on the same codebase without causing problems. Each individual branch can have any number of changes from the main.
Right now, we need to set up a git branch. Since this codebase is worked on by a lot of people at once, everyone creates their own branch to keep their code separate from everyone else's while it's being worked on. You start on the main branch, which is where the core codebase is. All projects should be created off of the main files, since that's the core everyone should be using.
Everyone can use each branch, so you can theoretically load up someone else's branch and start working in it, but that's inadvisable if you don't know what they're doing! Similarly, others can go into your branch and look at/modify your code. It's rude to do it without permission, but it can happen. When you git pull from github, you'll download all changes that have been uploaded.
Your branch will contain all of your code until you eventually have it pulled into the main branch when it's done. This step is the final step, so we're not there yet.
For me, I'm going to create a 'RoboRunner' branch with git branch RoboRunner and then git checkout RoboRunner to switch to that branch. checkout only works when there's no changed files, so if there's anything changed I'd need to stash it away with git stash.
Once inside the branch, I can now make my edits without worrying about wrecking other people's code or having ours screwed up by accident!
We'll go over more commands as they become relevant, but below is an overview of a bunch of the relevant commands.

If you'd rather use the GUI, you can press the above button in the VS Code editor and all the same functions and more are provided. You'll have to do a little exploring, but there's a lot of cool data in there! It's also helpful when resolving merge conflicts.
It's time to start writing code. Finally.
If you've been following along and run make all earlier you've probably already watched the program compile once. If you tried pressing F5, you probably even got the emulator up on screen. Since we've got our branch too, we can start making new files!
First, decide what kind of mode you want to make. I'm making a game so I make a new folder in main/modes/games/ called roboRunner. inside this folder, I make two new files, roboRunner.h and roboRunner.c.
These two files will be where my game sits. Let's start with the .h "header" file.
The header file, denoted by the file extension ".h", provides the overview of the program. When looking into a new program, library or other c functionality, it helps to look at the header file first as it provides the interface, or outward facing information.
Very few parts of the Swadge are going to be looking at our code, since it's not a library. The main menu needs to know it exist so it can be loaded, and if we decide to add trophies later that will need to know about it but otherwise? Nothing else really cares if Robo Runner exists. This is good, actually, since it means we don't have to do a lot of work making sure it plays nice with everyone else.
Here's the code required for the header file:
Very simple!
#pragma once Tells the compiler to only include this header once when compiling. Sometimes files are used by numerous other systems, and if it's already been compiled compiling it again can cause issues. All header .h files should have a pragma statement.
Note that some headers have a #ifndef _FILENAME_H_ instead of #pragma once. It's not exactly the same, but it does the same job. We'll use pragma since it's the modern way of doing things.
Moving on, the #include finds the appropriate file and loads the data and functions from it. swadge.h provides the core swadge functionality, so that's really important to have included in the program.
Lastly, we have extern swadgeMode_t roboRunnerMode;. This line lets other programs that #include this file access the mode you're about to make. Later, we'll add this to the main menu so you can enter the mode. Obviously, the roboRunnerMode is a name we want other parts of the program to use to refer to our mode and should be unique. extern just means we're going to be providing the details in the .c file later.
Save this file, and let's move onto the .c file!
The C file, denoted by the .c file extension, is the implementation of the mode. This is where we're going to be doing the majority of our code. As such, we're going to go more line by line, and then we'll look at the full file at the end.
First of all, we need to include our header file. Easy, it's just #include roboRunner.h. We don't need pragma, that's only for header files (.h).
Next, we're going to make the string that is used to display the game's name in the menu.
const char runnerModeName[] = "Robo Runner";
Let's break it down real quick:
Setting this to const saves this into the program memory, which is a lot larger than RAM. We'll get into memory management very briefly later. For now, know that it's usually better to put text strings in this format than to leave them directly in the code.
Now we need to add the three main function declarations. Functions and function declarations are different; The declaration provides the pattern and the function provides the implementation.
If we had functions other parts of the program would be using, the declarations would go in the .h file, since users of the file would need to see them. Functions internal to the .c file can be declared in the same file as the declaration.
Here's the three functions we're going to declare:
Some notes:
Something to note: Function declarations aren't strictly necessary. C is read from the top of the file down by the compiler, and as long as it finds each function before it's used, there won't be issues. However, forward declaring them means the compiler knows that the functions are around somewhere so it don't throw an error when it doesn't recognize it. On larger projects, not forward declaring functions can become a puzzle trying to make sure everything is found in the correct order.
Remember we made that extern swadgeMode_t in the .h file? Time to actually define it. We promised the compiler we would.
The swadgeMode_t struct allows us to define the behavior of the mode. This is where we set what peripherals we want to use and tell the rest of the program to use our enter, exit and loop functions.
We'll look at the structure and what each option means.
Our game is simple; we're using very few of the functions. That's fine though, just knowing that the options are there is good. If we decide to make the robot overheat so you need to throw the swadge into the fridge, we can always set the thermometer to true in the future when we need it. Code can be changed at any time.
So, we've finished telling the swadge what it needs to know to use our mode. We've got one final step until we're done with the .c file. We need to add the functions.
Seems pretty similar to the declarations, right? Instead of the semicolon we have curly braces, and we don't need to include the void inside the parens.
The names need to be identical, and the type of the variable elapsedUs (int64_t) needs to be the same, or else the compiler won't realize that these are the same functions and bind them. The actual name of the variable doesn't have to match or even be present in the forward declaration, but it's helpful for documentation reasons.
If we decided not to forward declare the three functions, then the swadgeMode_t struct wouldn't know what a runnerEnterMode was and would throw an error. Remember, the compiler looks from the top down, so if the first time in encounters runnerEnterMode is inside the swadgeMode_t struct, it's going to throw up it's hands and stop compiling util you fix it.
We can now move onto getting this compiled!
Now that we've got our code, let's make sure it runs!
First, let's hit F5. If the emulator pops up, great! No errors are preventing it from compiling. If you are encountering errors, see "Include Errors" and "Debugging" below.
Assuming it works, you can look around a bunch. Of course, you might be surprised to find your mode isn't in the menu. We still haven't properly added that, so let's do that now.
Sometimes there's an error where VS Code doesn't recognize all of the #includes, known as an include error. If this happens, try restarting your VS Code after saving all the files. Don't worry, VS Code will load the repo and all your tabs right back open. This doesn't stop it from compiling, but the red may hide more serious errors, so it's best to get rid of them.
if this doesn't help, another potential solution appears to be compiling with the idf, so follow the instructions for building the program for the swadge (idf.py) below and it should get fixed.
So, something is broken. You can tell because when you try to run the emulator it flashes before disappearing, or it just never compiles.
Fear not, the computer is trying to help you figure this out, believe it or not.
First, check the problems tab above the terminal. It should have a list of compile time errors, or errors that the compiler can catch before you even build the program. Make sure you solve all of these before trying to compile.
Once those are gone, if you compile and still get an error, you should be able to see some error messages in the terminal.
Pay attention to what the computer tells you in error messages. It will usually provide you a file, a line in that file, what it was trying to do and what the specific error was.
If all else fails, try searching the error message on the internet, or contact the rest of the swadge team on discord or slack.
Now, we're going to have to modify a few other files. Fortunately, only two more for now.
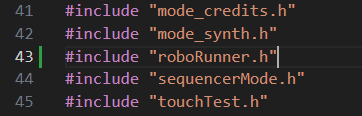
First up, we need to tell the other modes about our mode. Open main/modeIncludeList.h and add our header file to the list of includes.
Next, open main/modeIncludeList.c and add the following:
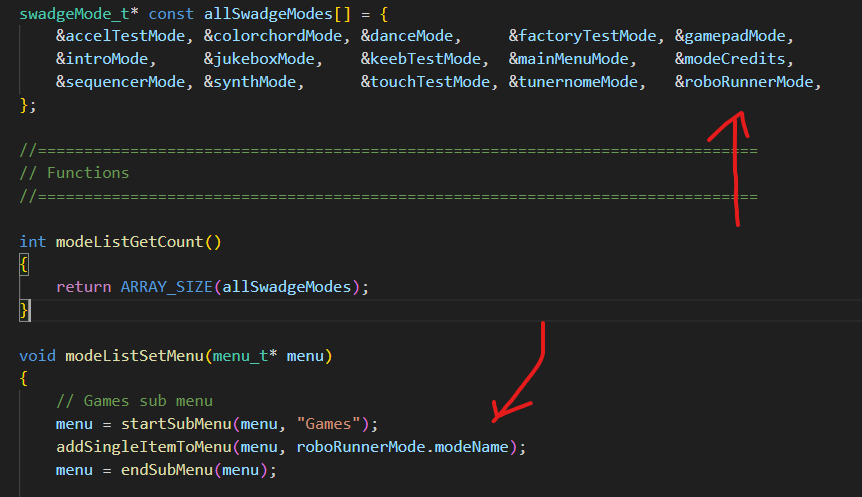
Now, we can recompile and load the emulator with F5 and we'll be able to navigate to the mode and load into it!
Congrats! The mode is running. It's just not doing anything, since we didn't actually provide any code for it to execute. We didn't even give it any way to handle input, so we can't even get out of it, we just need to close it down. But, it works!
Now that the emulator works, let's make sure we can compile it to load onto a physical swadge.
We can use the following commands to build the program for the swadge.
After that command completes, run idf.py build.
It should fail. Why? The idf doesn't know about these new files we made. See, there's two build systems included in this project, one for the emulator and one for the swadge hardware. The emulator uses make and the swadge uses CMake via idf.py. Make is able to find the files as long as they're inside the project, but we need to tell CMake where the files are.
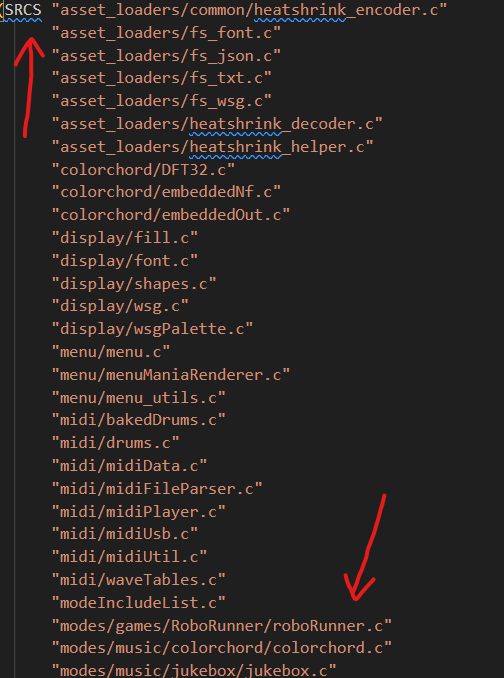
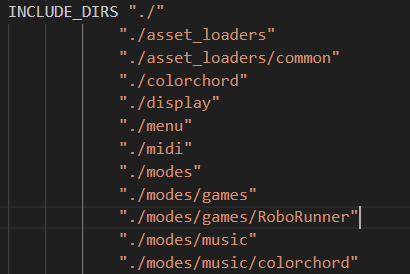
Inside main/CMakeLists.txt you'll see two big lists: SRCS and INCLUDE_DIRS. In SRCS, add any .c files you have. In INCLUDE_DIRS, include all directories you've made. This tells CMake to look inside this folder for files and sub folders, so if you forget to add them you're not going to be able to build the program.
Save the file, and let's try again. You should see a prompt telling you how to flash a swadge now. Go ahead and flash the program if you'd like to, just be aware that it will erase all the current data on the device, like your save data for the games already on the Swadge.
Congrats! you now have a working mode.
Now that we have something working, lets save it so if we break it in the future we can come back here and not have to rebuild everything.
It's good practice to commit your code after a feature goes in. We're going to be making a bunch of features in this mode, so we're going to commit each one so we can revert or check that the functionality isn't changing. If you get into the habit of only working on one part of the system and committing each time, it'll make returning to find and fix bugs a lot easier later.
Don't break commits into individual files if you don't have to, though. It's best to bundle all files that contribute to a feature into one commit so we can go back later and view everything related to a specific change. Imagine adding a bouncy ball to a game and teh ball has its own files. No point in including the changes to the main file without the bouncy ball. Similarly, there's no point in adding that helicopter image with the bouncy ball update since the helicopter image isn't being used by that system. Add the helicopter when it's being used.
First, I'll run git status to see what's currently going on.
Alright, so we've got three modified files. These are the ones we changed to add our mode to the menu and get idf.py build to compile. The other files are untracked, since they're brand new. We need to add all of these to the commit.
If you add "*" you will include all the files inside that folder. If the status command only lists files you want in the commit, you can just run git add * and it'll grab all files. Just be careful you didn't accidentally change other files first.
Now you can run git status again and verify all the files you want are added, and the ones you don't want aren't included. You can start over with git reset if you accidentally added the wrong files.
Once you're satisfied with the file list, run the following command: git commit -m "Initial Commit" This will add the message to the commit so you don't have to memorize a hash to come back. The message should be as descriptive as required, such as "misc bug fixes" or "Added blowing on microphone to jump". If you're writing paragraphs, you probably need to commit more.
The last step can only be done if we have write access to the github repository. If you have access, you can push to the external repo, saving your code outside you computer so other devs can work on it and if your computer dies you'll be able to pull the files back down.
Run git push --set-upstream origin RoboRunner to create the branch on the github server and send the files to it. You will have to log in.
If successful, your code is now saved to the cloud and can be pulled to a different computer!
We've done a lot of work and all we've got to show for it is a blank black screen, so in the next section let's give ourselves something to look at, hmm?
In this section, we're going to draw something to the screen.
First, we need to make an image to display. I'm going to make the little robot that's gonna do the running. I prefer to use Aseprite to make images, and here's the result!
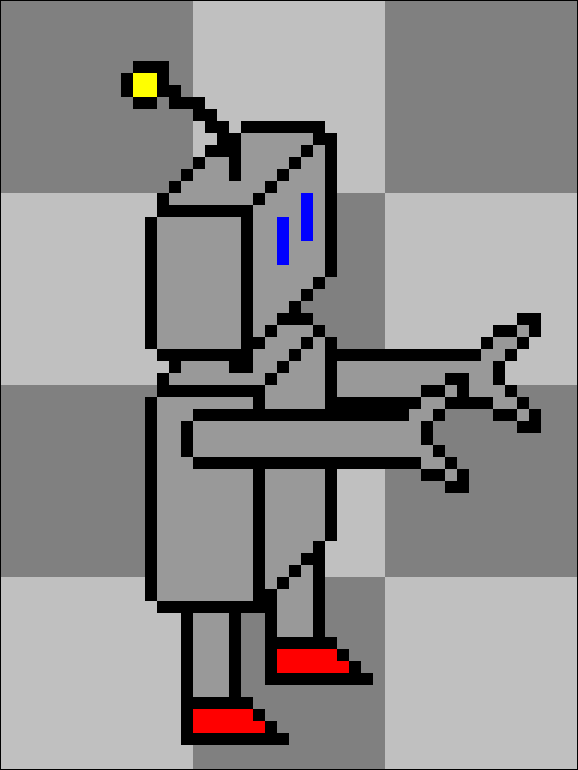
Did I mention I don't do art? I don't do art. Still, it's better to have this guy than nothing.
If you're following along feel free to use any other small PNGs or make your own. They don't need to be perfect, just something to see what's going on. Don't worry about quality, making programmer art is a time honored tradition among game developers. Remember, if you make something fun and want better art, we have artists who love to help work on the games we make. You can ask for their help, or help from other people in your circle who like to make art. Swadge games are collaborative, so don't be shy!
Some notes:
All art and sounds go into the assets/ folder in the repository. Make a new folder and copy all the assets into it. During compilation, they will be converted automatically to a format the swadge can use.
Now that I have some basic art, we can see about getting it into the Swadge. The Swadge has limited RAM, so each mode has to allocate and free RAM whenever the mode is entered or exited. We can't afford to have everything loaded all the time. If you recall us making the mode name up above, this is the reason we made it const so the bytes aren't taking up space in RAM.
The easiest way to make sure the RAM is properly managed is to put all the variables into a "mode struct", or a simple data structure that will contain all the data as we can load and unload it easily.
The above code creates a struct called runnerData_t with one member, that of a wsg_t called character. Anytime we use typedef, we are defining a new type, so we add "_t" to the end so we know what it is later. You'll note that the member, "wsg_t", is also a type. This is a naming convetion, and isn't enforced by the program but if you don't do it, other devs may call you out.
Of course, we don't know what the heck a wsg_t actually is, so let's look that up, shall we? One of the most important skills in game development is being able to read the technical documentation. Right now, we have no idea what this wsg thing is but it's certainly valid code.
If you navigate to the documentation's main page you'll find a lot of useful information. It's all generated directly from the code, so we can be sure it's up to date with the main branch. Here, we can go find the wsg.h file and figure out what it's used for. You can also highlight a type and either right-click a choose "go to definition" or hit f12 and VS Code will attempt to load the file so you can look at the code directly.
Turns out, it's our image handler. Pretty easy to get from context, but anytime there's something you want to know about, look it up in the documentation. In fact, maybe set aside some time to look through random bits of the library. See how other modes were built, look at the functions. This will help you figure out what the other devs have worked and how everything is organized. It's a good idea to bookmark the website for easy browsing later.
Well, now that we have our struct, we need allocate space and keep a reference to the memory space. We can accomplish this by first creating a pointer right after the swadgeMode_t struct:
And then by changing the enter mode function to the following:
That's a lot, but here's the breakdown:
So, pointers. It's not complicated, but when you're unfamiliar it does seem overwhelming. A pointer is an address to a value. Think of it like a mailbox. The mailbox contains the value, whether it's a single true/false or an entire swadgeMode_t struct. The pointer is the number on the side of the mailbox. Sometimes it's a lot easier to say "grab whatever's in mailbox 20" instead of describing each part of the data inside the mailbox.
In our case we're doing this because we don't actually know which mailbox our runnerData_t is assigned to. What we do know is that whatever that mailbox ends up being we've stored the number inside rd.
So, rd contains an address. We don't really care where, just that it exists. Great.
There's one more thing we need to do to avoid breaking the program. Right now, we've allocated the data, but we haven't freed the space for other programs to use once we're done.
We can accomplish this by changing the exit mode function like so:
This will free the memory.
Now we're going to allocate memory for the WSG. All assets (images, fonts and sounds) need to be allocated and freed just like individual blobs of memory.
Remember, the order of allocating memory matters! If item X contains item Y, and we free item X before Y, the program doesn't know how to access Y anymore and we cause memory leaks and crashes. Also, we can't allocate for Y if X isn't already allocated.
The two new functions we need are easy to find in the documentation, so if you checked it out you've probably already seen them.
storedImage is where we are storing an image to. We need to store it so it doesn't get deleted before we use it.
The ampersand "&" symbol means "grab the data inside the mailbox, not the number on the side of the mailbox". Conversely, an asterisk "*" indicated that you want the number of the mailbox instead of the data you're looking at, a pointer.
The image is the name of the image to load. Any .png file in the assets folder will automatically be converted. roboStanding.png will be converted to ROBO_STANDING_WSG next time the code is compiled. If it's already been compiled once, the program will autocomplete the word for you.
Lastly, that last true at the end of the load function tells the swadge which RAM to put the image into. When in doubt, leave it on true, as this will load it into SPI RAM. SPI RAM is slower, but a lot more plentiful.
We want to store the image into rd, which means we can replace storedImage with rd->character and image with ROBO_STANDING_WSG and then put them in our existing functions. The arrow notation between rd and character indicated that rd points to the character data.
Given we know that rd needs to be allocated, we need to put the loadWsg() function after the heap_caps_calloc() and the freeWsg() before the heap_caps_free(rd) functions.
Now, the wsg is loaded and we can actually start to use it!
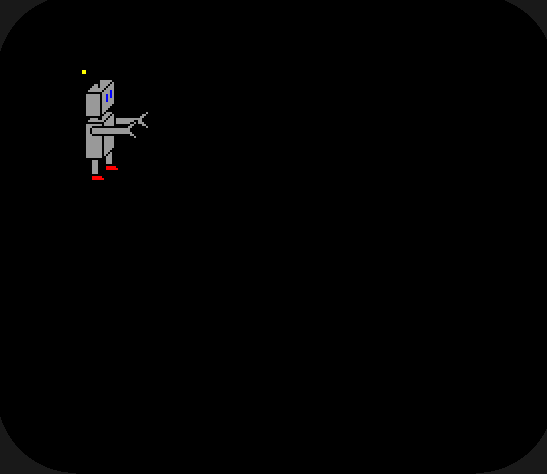
In the main loop function, add drawWsgSimple(&rd->character, 32, 32);
We pass in three arguments:
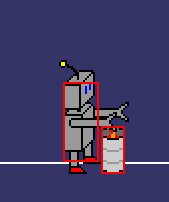
The Swadge draws images assuming the top left corner is the start. For our example, the top left corner will be located at 32 pixels across, 32 pixels down resulting in the following once we press F5 and load up the new mode:
Some things you'll note if you start to play with the numbers is that the corners of the screen are obscured. This is because the real screen we're using has rounded corners. The shrouded portions are roughly equivalent to the real screen, but not perfect. this is one of those things you want to test on real hardware. Another thing to keep in mind is that pixels are changed based on the last thing drawn to them, so things drawn first will be overwritten by things drawn later.
Next, we'll add some ground to stand on.
Before the function drawing the sprite, add the following line: drawLine(0, 184, TFT_WIDTH, 184, c555, 0);
If you look into the documentation for drawLine() (shapes.h) you can see that if you specify the start x and y and the end x and y you can draw the line. We set both Y values to 184 since that seems about right, but the X values are on opposite sides of the screen (0 and 280). This draws a white line directly across the screen.
Play with the colors (try c500, c050, c005, and c123) and the x and y positions on either end and watch how the line moves. Make sure to save the file before reloading the emulator! Also play around with the position of the robot so it looks like it's standing on the white line or maybe just below it, like it's the corner of the room. We'll need that number later.
If you place the draw line function after the drawWsg() you'll notice the line draws on top of the robot, which definitely looks wrong. Remember, draw order matters.
Right now, we're drawing the robot standing in the same place every frame, which is boring. Let's get some actual movement on screen!
Let's get the jumping ability coded. Since the obstacles come to us, we just need to jump up and then fall down. The robot can only jump when on the ground. We'll allow the player to press either the A button or the up button to jump, and we want the robot to have a graceful arc.
An improvement to game feel might be to vary the height of the jump based on the length of the button press, but that's more than we described above. Maybe we'll fit it in later.
We're going to start to accept inputs now. Update the main loop to look like the following:
Here's a breakdown of the parts of the input:
You'll note that when checking if the button is A we used & and for checking the up button we used ==. Both do the same thing here. & could be used to check for multiple button presses at the same time in buttonEvt_t.state while == will only ever check for one specific value. It's a matter of preference if you're not combining multiple buttons.
Now we know if the player has pressed buttons, but we need to define what it means to jump. Obviously, we're going to want to see the robot jump, and that involves moving on the Y-axis (up and down), so we're going to need to track the Y position. We're also going to need to know what speed the robot is going, and whether it's up or down. Lastly, we're going to need to know if the robot is on the floor.
This results in three variables: Y position, Y speed and a boolean "if on ground". Y position is where the robot is in space, the Y speed is how fast he's moving, and on ground tells us if the robot can jump again. After all, he's using his little legs, not a jetpack.
Modify the runnerData_t struct to look like this:
This will allow us to save this data between frames. You access it the same way you did with the wsg, so I'm not going to point it out anymore. Now we need to decide what to do with these variables.
First of all, change the 128 in the robot's drawWsgSimple() to rd->yPos. We want the image to follow the height we give to it. Right now rd->yPos starts at 0, so it'll draw the sprite at the top of the screen.
Next, we want to change the speed. After the input while loop, add the following:
The first line adds the current speed to the robot. The second line increases that speed every frame. It's adding 1 because y increases in the downward direction, so this acts like gravity.
+= is a shortcut. Expanded out, this looks like rd->yPos = rd->yPos + rd->ySpeed;. This is the convention since it matches how CPUs actually handle the data, but it's a lot less text to type out if we use +=. There's no difference to the computer at the end of the day, so don't stress out about it.
Lastly, let's add something into the input loop. Add rd->ySpeed = -12;. It's negative because we want to go up, and -Y is up. You'll note we don't use += here, and that's because we don't care what the value used to be, we want it to be -12 when we hit the key.
Let's hit F5!
Well, that's not right.
If you restart the program and spam the jump key, you'll see that the robot can actually stay in frame if you jump fast enough. Congratulations, we've just made flappy robot. Seeing as that's not the goal, let's take an inventory of the issues:
We'll tackle the visuals first.
The Swadge doesn't automatically refresh the screen, as it turns out. Any pixels not updated from the last frame will remain the same. This could be used to optimize things if the mode is very, very overworked and limited on spare processing power, but in general we can just redraw everything each frame.
In our case, we're already drawing everything we want each frame, so all we need to do is clear the screen.
Add a simple fillDisplayArea(0, 0, TFT_WIDTH, TFT_HEIGHT, c001); before the line and wsg draw lines. If you want to, you can change the color to see which you like best. This function draws from the top left corner (0, 0) to the bottom right corner, (TFT_WIDTH, TFT_HEIGHT) in the color chosen. Since it'll write over every pixel, the only things we'll see on the next frame are whats drawn that frame. clearPxTft() works too, if you want to clear to black.
Really, we should have seen it coming. We didn't use onGround, so obviously it's not going to work!
Change the (evt.button & PB_A || evt.button & PB_UP) to ((evt.button & PB_A || evt.button & PB_UP) && rd->onGround). The parenthesis are import for grouping here, so make sure you get it right. Whatever is inside the innermost set of parenthesis will evaluate first, and we want that to be the button check. If either of the buttons are pressed, we can check if we're on the ground. && is the logical AND operation, so what just told the program is: "If the A or up button is pressed, and the character is on the ground, add the negative speed."
If we run the program now, all we've managed to accomplish is stopping the flappy jumps. This is because we've never set onGround to true, so we can't ever jump. Instead of doing an actual collision check, let's just use where the robot is on the screen to determine if it should be on the ground or not.
We can add the following check after setting the ySpeed to += 1:
And after we set the ySpeed to -12, we can add a single line: rd->onGround = false;
Now the robot will know it's hit the ground if it's low enough on the screen, but we still haven't stopped it entirely. Right now, the speed keeps accumulating and the robot keeps falling.
Inside the new if loop, we can add two more lines to make the robot behave as we want:
Setting the position to 128 means that it doesn't matter exactly how far the robot fell below the ground, we'll snap it back to the level of the floor (which I have determined through trial and error is 128 pixels down the screen) and set the speed to 0.
Technically, we don't need to set the speed to 0, but if we don't and we wait long enough the integer will overflow to a massive negative number and the robot will go shooting into the sky. We'd have to wait roughly nine minutes at 60FPS, and it would just look like the robot disappears since it'll be moving so fast. We really shouldn't ever encounter this as a bug, but "shouldn't" doesn't mean "won't". Let's fix it.
An interesting experiment is to only set the speed to 0 and not update the position. The robot gets stuck below where we wanted him to on the floor. He overshot on the initial fall from the top of the screen and since we're not resetting him to the ground, he just stays down there. If we set yPos at the start of the program, we could avoid needing this line entirely! I'll leave it though, since it works fine.
Now the robot should jump as expected!
I promised to tell you about macros, and here's where I'm doing that.
Macros are a "preprocessor" step, which means the compiler moving things around before actually compiling your code. Sounds scary, and if used incorrectly it causes all sorts of problems. So then, why tempt fate and use them?
Because they can be very useful in getting rid of magic numbers, that's why. Right now, we have plenty of magic numbers, or numbers that we just put in without saying how we got them.
The code works the way we have it, but what if you want to raise the height of the ground line by one pixel? You have to change it in several places. Or, we could forget what -12 means. Or, what if we don't know how wide the screen is?
Remember, we used the TFT_WIDTH and TFT_HEIGHT macros before. We didn't make these, someone else did. Presumably, if the screen size is changed, we can assume that these Macros are being changed appropriately, so we don't suddenly find our code doesn't work because the screen is 32 pixels wider or something. It also helps us as devs since we don't need to remember how wide the screen is, we can just grab the number.
In the same way, we can define our own Macros to provide us with an easy way to tweak the program, and recall what the value is.
At the top of the file, just under the #import statement, let's add the following lines:
This will allow us to use the tags we've written to replace the magic numbers. Go back through the file and replace the numbers with the Macros.
Note that you shouldn't be replacing every value. 0, for instance, isn't the same value in all instances. Sometimes it's the initial x or y coordinate, sometimes it's the length of the dashed line. If we had two numbers that were both 32, but only one of them relates to the player, we don't want to adjust the player and this other number when we're not expecting to.
In addition, obvious numbers don't need to be included. We don't want dashed lines, but since the function requires it, we're just going to put a 0 in there. We don't care what it is, it works and we're never going to adjust it.
Now that we've put in the Macros, the code should look similar to this:
If you want, try playing with the macro values to find something you like.
Now that we've started to get a handle on things, this tutorial will move a little faster.
Now that we can jump to avoid obstacles, let's add some obstacles to avoid.
We're going to have two obstacles: One for the top of the screen to make sure you're not jumping and one on the bottom to force you to jump.
First, let's make a new struct for the obstacle.
rectangle_t is from the geometry library, which we don't have included yet. It's easy, just add #include "geometry.h" near the top of the file. The errors should go away as soon as VS Code catches up. The geometry library has functions for checking collisions, so that's going to be useful going forward. If you want specifics, check out the file.
Next, let's refactor the player to allow for collisions. Refactoring is converting code from one format to another, theoretically without changing the functionality. Moving where code is for clarity, removing unnecessary code, stuff like that. The data saved in the runnerData_t struct can all be moved to a player struct. This will keep all the relevant data together. In addition, we're going to use rectangle_t to provide the yPos instead of the current variable, since it's otherwise a duplicate.
The struct section should look a lot like this now.
In the runnerData_t, we're now storing one copy of the robot and two copies of the obstacle. This is another magic number we can change to a Macro. I'll leave that as an exercise for the reader.
Now that we've refactored, there's a lot of red. Let's start converting them.
The rest should be evident. Once you're done, hit F5 to make sure that the code still runs as expected.
While we're refactoring, let's also break out some of the code into more functions. Keeping the draw calls in the same place will come in handy later, as well as handling the logic updates separately.
Make new function declarations near the top like this:
We're not using the elapsedUS right this moment, but we're probably going to need to soon. Cut the drawing functions and add them to the draw function, then add the draw function to the end of the loop. Do the same with the player logic as well.
We've added a lot of code and nothing has changed behavior-wise. That's what refactoring is like, but now we have our code split a bit more and can follow where everything goes easier.
Now we can start spawning some obstacles. I've drawn the obstacles with my expert artistic skills.
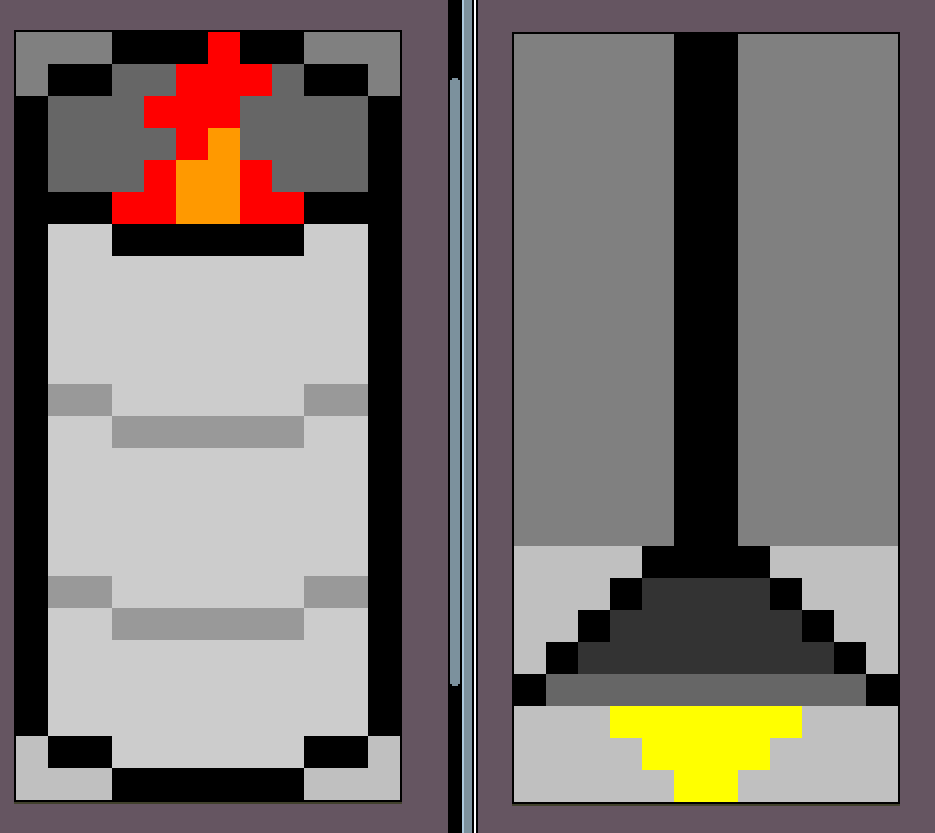
As before, art is essential to get a general feel for a game so it's not all just code, but it doesn't need to be perfect, especially at this stage. If you want to go overboard with the art, that's fine too. I lean toward the former, obviously.
First, let's load and unload these new files. The following snippits of code are a really useful pattern, since you only have to add the file identifier once and it will be automagically loaded and unloaded.
Here's a breakdown of the process:
An important part of programming is loops. There's three primarily used in C:
For loops are extremely common, and they have their own loop counting variables built in. in this case, idx. You can see that first we set it's initial state to 0, tell it to continue until it matches the array size of obstacleImages and finally tell it to increment by one each loop (idx++). Note that if we want to, we can change idx inside the loop, but doing that thoughtlessly could get the computer stuck in the loop. The condition to exit the loop is that idx needs to be larger than the array, or 2. If we set idx to 0 at the end of each loop, the end of the loop will change the value to 1 and it will get stuck doing this infinitely.
The "++" notation can be used on any variable. It's just faster to write idx++; than writing either idx += 1; or idx = idx + 1; and can sometimes be used in tricky ways to speed up the program, but that's far outside the scope of what someone new to developing needs to worry about. "--" works in the same way to subtract one.
While loops check that a condition is true and loop if it's not. while(y > 0) {} will execute everything inside the curly braces until y is less than or equal to 0. It's important to update y inside the loop or the program will get stuck.
Do While loops are just while loops, but will run the content of the curly braces once before checking the condition. do { } while (y > 0); will execute everything inside the curly braces at least once, even if y is already less than 0.
Next, let's discuss how we want to handle the objects. First, we need to give them an initial spawning position and give it a sprite to draw. Then we need to get them to move based on how long the game's been running. Third, we need to spawn them randomly.
We're gonna need a bunch of code for this, so let's get to typing.
First, let's make a spawn function.
and temporarily, we can throw the following into the mode entry function to test that they draw:
Something to remember about C is that the variables don't have a default state when initialized. int abc; could hold literally any value that int can hold. Thus, we need to set it first. Things that only need to be set once can be set to const or during the mode entry function, whereas other items may need to be set more often, like our obstacles. Each time a new one is made, it has to be moved to the far side of the screen, set to either a lamp or a barrel, and then assigned the appropriate height and image. All common variables can be set regardless, which makes the code shorter and easier to read.
We have to have to set both obstacles to false before any code could try to call them, find a random true in the .active slot and then try to load who knows what data.
Now we check how it looks, and... well, the lamps are really hard to see on the black background, and they're too high. it would be impossible for the robot to hit them evan at max jump height.
Let's change the color of the background to something easier to see the lamps on. Using c112 instead of c001 in the fillDisplayArea() function will lighten the colors one shade. That will make the lamps easier to see.
Next, let's create a ceiling to lower the lamp without having it suspended in space. Much like we draw the ground, we can draw the ceiling with a single white line. Just copy and paste the ground line and make a CEILING_HEIGHT define to a value below the jump height.
Lastly, change the lamp to start at CEILING_HEIGHT instead of 0.
This leaves a lot of space over top of the play area, but we can use that for displaying the high score or current score later.
We don't want the obstacles to just sit there and taunt us, we need them to charge us. Well, we want it to look more like our robot is charging the obstacles, but functionally we'll just have the obstacles come to us.
As a first, "let's just get it to work" type start, let's subtract one from it's x position every loop of the game.

That turns out to be too slow. A snails pace. The actual speed will depend on the hardware, which is actually worse but we'll fix that in a bit.
We can speed it up by changing the amount that is subtracted each round. Trying rd->obstacles[idx].rect.pos.x -= 3; This feels okay, but reveals a problem. We're locked to integers, which are kind of restrictive.
Instead, we're going to use elapsedUs. This value is how much time has passed between the most recent call to the main loop and the previous. This is useful if we want the timing to be consistent despite framerate. For example, elapsedUs would be 1,000,000 if the swadge is operating at 1 update a second, and roughly 16,377 if it's operating at 60 updates a second. Since each update is basically a frame, this equates with frames per second. Each frame has a length of time it took to execute, and it can change frame to frame. We want to minimize the impacts this has.
Let's make this a new function, static void updateObstacle(obstacle_t* obs, int64_t elapsedUs){} and add that instead of subtracting a constant value.
With these settings, every 6.7 milliseconds the obstacles will move a pixel to the left. After one second, it will have moved 150 pixels. It doesn't even matter how many frames per second the swadge is getting, if there's fewer frames it'll just subtract more per frame.
You really should base all time dependant things on the elapsedUs variable instead of relying on a steady FPS, especially animations. We'll get to those later though.
Now is a great time to delete the - 64 from the x coordinate of the spawnObstacle() function. We know it'll scroll onto screen almost immediately, so we don't have to pop it onto screen to test if it's actually spawning.
Currently, we spawn two obstacles in the initialization stage, but never again. This would be a very short or very long game depending on interpretation. As long as you dodge the first two obstacles you'll be able to go forever.
Instead, let's spawn them randomly.
esp_random() is a function that generates a random number between 0 and 4,294,967,295. We don't need all those values, so we pull off a math trick.
I swear this isn't scary. If math is scary to you, I promise that this won't hurt and I'll make it easy.
First off, know that division sucks for computers. While addition, subtraction and multiplication are very easy, division doesn't calculate as easily. There's tricks to get around it, but that's not the point of this exercise.
When a computer divides integers (whole numbers, 1, 2, 54389820, but not 0.3453 or 438290.5) and it's an uneven division, it calculates with a remainder. For example, 10 / 3 is equal to 3 remainder 1, not 3.333. Of course, the remainder isn't tracked in a division operation. Instead, we can used the modulo operator (%) to get the remainder. So, 10 / 3 = 3, and 10 % 3 = 1.
Why is this useful? Well, let's say we want to pick between two obstacles. If we take the random number we generated (0 to 4 billion-ish) and modulo by 2, the result will either be 0 or 1, and those are the values corresponding to a barrel and a lamp!
Note that modulo never gets the value listed. If modulo is 2, it can only generate 0 and 1. If it's eight, it will generate 0 through 7.
We also used esp_random() to make a spawn chance. Every loop, there's a 1 in 80 chance to spawn a new obstacle if there's a slot free. We calculate this chance by doing modulo 80 which provides a value between 0 and 79, roughly at all the same chance of occurring. Then, we ask if it happened to land on 0. If so, yay! We can spawn an obstacle. If not, then we'll try again in the future.
Now delete the two spawnObstacles() in the mode enter function, and try the game out.
...And it doesn't work.
Well, should've seen this coming. We only have two slots for the obstacles, but we never let anything else use them after we set them to active.
All we need to do is make sure they're off screen before setting .active to false. Add the following to updateObstacle():
Now we're almost done with the core gameplay. We can jump and try to avoid collisions... but we don't lose if we collide. Let's set that final part up and we'll have something we could actually call a game!
If we go way back, we added the geometry.h library and used rectangle_t for the position, height and width of the obstacles. We also changes the robot's position data to be based on a rectangle_t. Fortunately for us, there's already a performant collision checking algorithm built into geometry.h so we don't have to think too hard about axis-aligned bounding boxes if we don't want to.
Of course, the first thing we need to do is set the robot's rect's size. We never did that, since it wasn't important until now! Add these into the enter mode function:
Now, something that's really helpful is to visualize the hitboxes. Right now we know that the hitboxes are the right size... probably, but it's always better to verify.
Inside the draw function, let's add the following lines:
And make sure to put them at the end of the draw function or the rectangles will be drawn over.
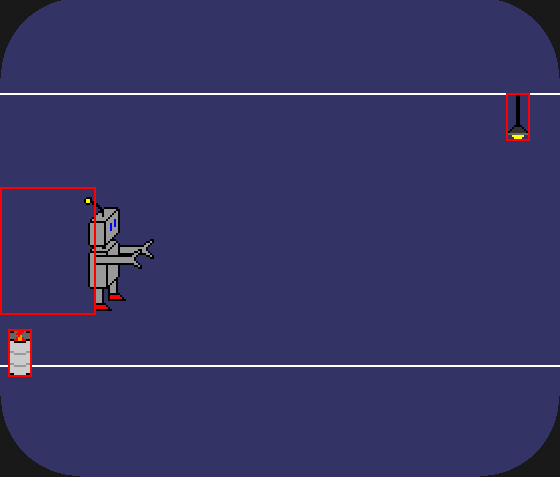
Alright, the two main obstacles look okay, but something's up with the robot. What did we do? The size looks about right... ah, we never set the robot's rect.pos.x. Again, we never needed to, so why bother? rd->robot.rect.pos.x = PLAYER_X; can be added after defining the box and we can try again.
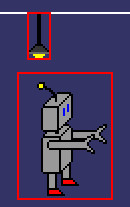
Well, that's better, but probably going to feel very unfair. The hitbox is really big compared to the robot.
Of course, this doesn't actually shift the box into the right position, it just pulls it back. We want it to match the player's image as closely as possible to not feel cheap.
Since the rect's position needs to be adjusted, we're going to have to move the box forward and down, and then move the image back and up by the same amount so the image doesn't change it's position on screen, but the hitbox is in the right place.
Much better. Now, let's handle the collision instead of letting the obstacles just phase through the robot, shall we?
It's actually really easy:
We have to check each obstacle. Well, we have to check every active obstacle, and we should check if it's active first because that's a lot faster than than checking the collision. Then we check the collision by passing in both the rects for the obstacle and the robot.
The collision vector indicates a direction pointing from the second vector to the first. This means that it will point from the obstacle being checked toward the robot if they collide. This could be useful... but not for us right now.
Now that we've checked for a collision, we need to decide what to do with it. Probably just reset the game, right?
We can replace the obstacle initialization in the enter mode function with resetGame()as well.
And... well, it's functional. There's a lot to be desired in terms of functionality, but it's technically a game. It's really hard to tell when we reset and also how far we get, so let's add a score system next!
First, we have to define how we want to be scored. Do we want to increase the score each frame? probably not, since that can vary. How about once a second? Well, the obstacles might come faster later, and we want to reward holding on to the very last moment.
How about each hundredth of a second? That seems pretty granular and will generate large fun numbers.
Let's add the following code:
This should handle generating the score. We save remainingTime so we don't cheat the player out of points because our frames are too fast.
Now let's draw the text.
That's easy to understand, right? No? Alright, let's go through it:
Great. Now we have a score drawing on the screen that resets when the player collides with an obstacle. Too bad it resets immediately.
Easy enough to do.
Something you'll quickly note if you try this a few times is that when you close the emulator or change modes the score isn't saved. That's because we're working in RAM, which dies every time memory is freed or the swadge turns off. What we need to do is write to the ESP's onboard Non-Volatile Storage (NVS). The NVS isn't that big, but we can store plenty of info for what we're attempting. We're only saving one number!
There are a few things you do need to watch out for though. NVS has a limit to the amount of times it can be written to. This isn't something that's likely to come up in normal usage, but if you're saving data Constantly you will burn out the NVS sooner rather than later. Saving a high score at the end of a game is good. Saving a new score every time it increments is bad. Reading incurs no penalty. There's a lot of hardware trickery going on in the background to ensure the data is saved properly, so it's best not to worry about it too much.
To save the final score, let's add a function to save the high score when it's set:
And that's it. More complex objects can be saved, just refer to the NVS file in the docs for hints on that.
Why not add bonus score when the player's cleared an obstacle? Basically, if it's off screen behind the player, we can add points.
This reveals another bug. We kind of... never stopped moving the obstacles off the screen. Let's check that they're active before updating.
There we go!
We really should increase the difficulty with time. We have three ways of tweaking that:
Let's start with spawning rate. It's currently at 1 out of 80 chance to try to spawn a new obstacle, so let's give it a variable to change over time.
Now the objects will spawn slightly more frequently. We can do something pretty similar for the speed across the screen.
Now it's starting to feel like a game.
Last little bit of difficulty we'll add is increasing the number of obstacles we can have at once.
And that's it!
So far, this mode has been entirely silent. Making sounds is outside the score of this tutorial, but we have excellent help and we're encouraged to borrow sounds from other modes. There's an "attic" folder with old code and assets, and if you move the files from the attic into the assets folder proper, you can use them too.
There's two methods of making noise:
We'll do both. First, we'll find a good racing soundtrack for the BGM.
CHOWA_RACE_MID sounds pretty fire, so let's use that.
The BGM should play as soon as the game starts, so we'll put it in the entry mode.
This should feel kind of familiar at this point. We've loaded a few things before, and we've torn them down too.
However, there's a few extra functions in there. The global midi player has to be set to use the default instruments (midiGmOn()) and has to be set to loop. We temporarily grab the global player to do both of those.
Next, we're gonna make simple collision noises. We'll do this when the robot collides with an obstacle.
Because this is the percussion instrument channel 10 (number 9, second argument) we can just play and it'll stop by itself. Individual notes are more complicated.
The BGM is kinda loud too, so lets also set the volumes of the BGM channel:
NOTE: Midi system is undergoing upgrades to make it more user-friendly. This tutorial will be updated when that happens.
Alright, we're getting to the end of this tutorial. The last thing we're gonna implement is some nice and simple animations:
The easiest of these is the barrel flames. It's not tied into any system so it can just animate. We still need to refactor a few things though.
Now the barrels animate!
Next let's get the walking working.
Next, lets add the death animation. This one will be more involved since we need to not immediately reset.
This will have the robot get knocked over. We'll also update the controls so if the robot is dead it waits for a button press to continue.
Lastly, we'll add fake windows so it looks like we're moving even when there's no obstacles on the screen.
And with that, we're fully done!
Here's the final code as described in this tutorial:
This isn't exactly polished. We've got code all over, testing code we don't really need anymore commented out, and some repeated code we could really factor out. It's not too much of a problem, we can refactor if we have time, or want to put more features in and this becomes unwieldy.
But, it also works right now. It's a full game that is moderately fun to play, and with a little tweaking it could be something great.
So let's take the checklist we started with and see how we did.
Looks like we did a pretty good job.
So, what's next? Well, we can either claim this one it done and move on to the next project, or we can continue to polish this one up. Here's the list of some more things that could be added to make the game more fun:
Some other things:
I hope this tutorial has been useful in getting you started. Feel free to ping me on discord or talk to me on slack if you happen to need assistance. I'm JohnnyWycliffe on both.
Good luck with your future swadge modes!